Senor_2
MR2 Deity

- Total Posts : 600
- Scores: 74
- Reward points: 4558
- Joined: 2011/04/07 19:51:15
- Location: Sydney NSW Australia
- Status: offline

RE: robk's MR2 Turbo
2011/01/06 14:11:58
(permalink)
Nice work on the gauges Rob, will have to do this shortly and install my Omori and LEDs soon. I'll need to dust off the soldering iron and put together one of those dimmer circuits too!
|
robk
MR2 Deity
- Total Posts : 2172
- Scores: 314
- Reward points: 5229
- Joined: 2011/04/07 19:51:15
- Location: Sydney / Central Coast, NSW Australia
- Status: offline
RE: robk's MR2 Turbo
2011/01/06 14:43:07
(permalink)
quote:
Originally posted by Senor_2
Nice work on the gauges Rob, will have to do this shortly and install my Omori and LEDs soon. I'll need to dust off the soldering iron and put together one of those dimmer circuits too!
Thanks mate, let me know if you need a hand with the Omori boost gauge and/or LEDs. BTW I definitely want a strut for my engine lid when you have more available!
|
stuka
MR2 Deity
- Total Posts : 1183
- Scores: 113
- Reward points: 4767
- Joined: 2011/04/07 19:51:15
- Status: offline
RE: robk's MR2 Turbo
2011/01/06 19:30:56
(permalink)
is this run in yet, when is the power tune?
|
robk
MR2 Deity
- Total Posts : 2172
- Scores: 314
- Reward points: 5229
- Joined: 2011/04/07 19:51:15
- Location: Sydney / Central Coast, NSW Australia
- Status: offline
RE: robk's MR2 Turbo
2011/01/06 23:35:05
(permalink)
quote:
Originally posted by stuka
is this run in yet, when is the power tune?
It's still not fully run-in (remember I don't have a license, so it makes it tricky). It is partially run-in because it's been on the dyno a few times, but I think my mechanic might drive it home a few times in coming weeks to finalise the run-in once and for all. He said once it has done about 1000km we'll do an oil change then do the full power tune. It's not urgent for me, as I can't drive it myself until April anyway lol, and at least I've been completing a few jobs on the car in the meantime such as the cluster, and I've started fitting an oil pressure gauge too. I'm sure you are all as keen as I am to find out how it performs with the boost cranked up, and you guys will be the first to hear about it when that happens!
|
Senor_2
MR2 Deity
- Total Posts : 600
- Scores: 74
- Reward points: 4558
- Joined: 2011/04/07 19:51:15
- Location: Sydney NSW Australia
- Status: offline
RE: robk's MR2 Turbo
2011/01/06 23:49:45
(permalink)
quote:
Originally posted by robk
Thanks mate, let me know if you need a hand with the Omori boost gauge and/or LEDs.
BTW I definitely want a strut for my engine lid when you have more available!
Will do, actually, do you have any more pics of the dimmer circuit you put together? Looks nice and neat and compact. Should hopefully have some struts available soon mate, will let you know.
|
robk
MR2 Deity
- Total Posts : 2172
- Scores: 314
- Reward points: 5229
- Joined: 2011/04/07 19:51:15
- Location: Sydney / Central Coast, NSW Australia
- Status: offline
RE: robk's MR2 Turbo
2011/01/07 00:09:08
(permalink)
quote:
Originally posted by Senor_2
quote:
Originally posted by robk
Thanks mate, let me know if you need a hand with the Omori boost gauge and/or LEDs.
BTW I definitely want a strut for my engine lid when you have more available!
Will do, actually, do you have any more pics of the dimmer circuit you put together? Looks nice and neat and compact.
Should hopefully have some struts available soon mate, will let you know.
So you have the same Omori electronic boost gauge as me? Are you coming to the work and learn thing on sat? The whole installation procedure I went through is still very fresh in my mind. The dimmer circuit is cogs' design, it is on a website he made, here: http://home.exetel.com.au/cogs/Omori_dimmer.htmlAs you can see, he etched a nice circuit board for it and mounted it to the holes where the stock boost gauge signal conditioning circuit usually goes. I chose to use vero board instead for simplicity (exact same circuit though), and I still put it in the same spot but I didn't attach anything to those 4 adjacent holes in the cluster like cogs did (he had a good reason to utilise those holes, because he used some of the stock boost gauge wiring which already runs to the engine bay). I didn't use any of the existing wiring from the stock boost gauge, I just installed the Omori gauge separately from everything else.
|
YB07HA
MR2 Enthusiast

- Total Posts : 185
- Scores: 0
- Reward points: 5719
- Joined: 2011/04/07 19:51:15
- Location: Sydney Australia
- Status: offline
RE: robk's MR2 Turbo
2011/01/07 10:52:33
(permalink)
Nice work with the cluster!
Just curious as to why you opted not to the using the existing wiring for the boost gauge?
|
robk
MR2 Deity
- Total Posts : 2172
- Scores: 314
- Reward points: 5229
- Joined: 2011/04/07 19:51:15
- Location: Sydney / Central Coast, NSW Australia
- Status: offline
RE: robk's MR2 Turbo
2011/01/07 11:01:40
(permalink)
quote:
Originally posted by YB07HA
Nice work with the cluster!
Just curious as to why you opted not to the using the existing wiring for the boost gauge?
I already used some of the stock boost sensor wiring for connecting my MSD 3 bar MAP sensor to my Adaptronic ECU, so I didn't want to risk affecting that.
|
Senor_2
MR2 Deity
- Total Posts : 600
- Scores: 74
- Reward points: 4558
- Joined: 2011/04/07 19:51:15
- Location: Sydney NSW Australia
- Status: offline
RE: robk's MR2 Turbo
2011/01/07 11:13:24
(permalink)
quote:
Originally posted by robk
So you have the same Omori electronic boost gauge as me?
Are you coming to the work and learn thing on sat?
The whole installation procedure I went through is still very fresh in my mind.
The dimmer circuit is cogs' design, it is on a website he made, here:
http://home.exetel.com.au/cogs/Omori_dimmer.html
As you can see, he etched a nice circuit board for it and mounted it to the holes where the stock boost gauge signal conditioning circuit usually goes. I chose to use vero board instead for simplicity (exact same circuit though), and I still put it in the same spot but I didn't attach anything to those 4 adjacent holes in the cluster like cogs did (he had a good reason to utilise those holes, because he used some of the stock boost gauge wiring which already runs to the engine bay). I didn't use any of the existing wiring from the stock boost gauge, I just installed the Omori gauge separately from everything else.
Yep same gauge, been sitting in my "parts to one day install in the car" pile for a while now... Not sure about the work and learn day, might be stuck under my car replacing a snapped handbrake cable [B)] Yeah I took a look at Cogs' write up, very well done, will be copying that design (thanks Cogs! lol) but may use some of the wiring I have from the elec Autometer boost gauge I installed previously
|
YB07HA
MR2 Enthusiast
- Total Posts : 185
- Scores: 0
- Reward points: 5719
- Joined: 2011/04/07 19:51:15
- Location: Sydney Australia
- Status: offline
RE: robk's MR2 Turbo
2011/01/07 11:18:58
(permalink)
quote:
Originally posted by robk
quote:
Originally posted by YB07HA
Nice work with the cluster!
Just curious as to why you opted not to the using the existing wiring for the boost gauge?
I already used some of the stock boost sensor wiring for connecting my MSD 3 bar MAP sensor to my Adaptronic ECU, so I didn't want to risk affecting that.
Man my english was bad loll wouldn't mind having a word with you on saturday about the whole install/setup.. if you don't mind 
|
robk
MR2 Deity
- Total Posts : 2172
- Scores: 314
- Reward points: 5229
- Joined: 2011/04/07 19:51:15
- Location: Sydney / Central Coast, NSW Australia
- Status: offline
RE: robk's MR2 Turbo
2011/01/07 12:06:01
(permalink)
No worries, I'm happy to help!
|
robk
MR2 Deity
- Total Posts : 2172
- Scores: 314
- Reward points: 5229
- Joined: 2011/04/07 19:51:15
- Location: Sydney / Central Coast, NSW Australia
- Status: offline
RE: robk's MR2 Turbo
2011/01/07 19:23:04
(permalink)
I finished fitting my oil pressure gauge today (well, the cabin side of things, not the sender). This also means that I've taken photos of the cluster fully installed back in the car too. 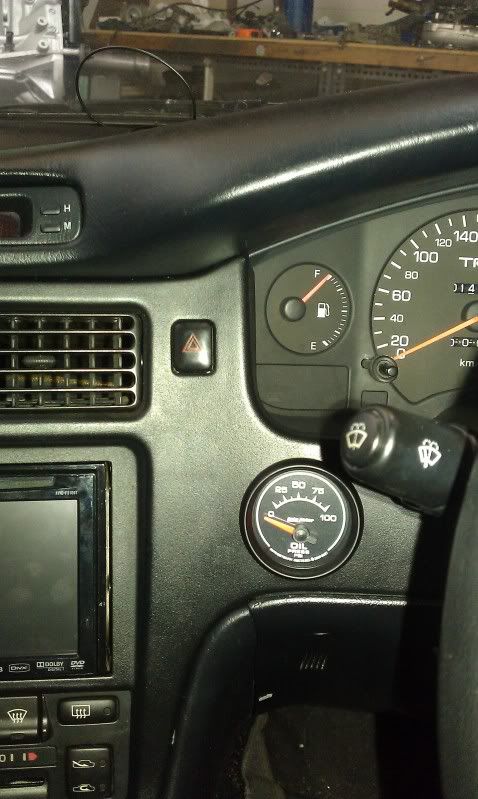 I didn't realise the oil pressure gauge would have red illumination instead of white, but it's alright because I've now set my head unit to red illumination too. 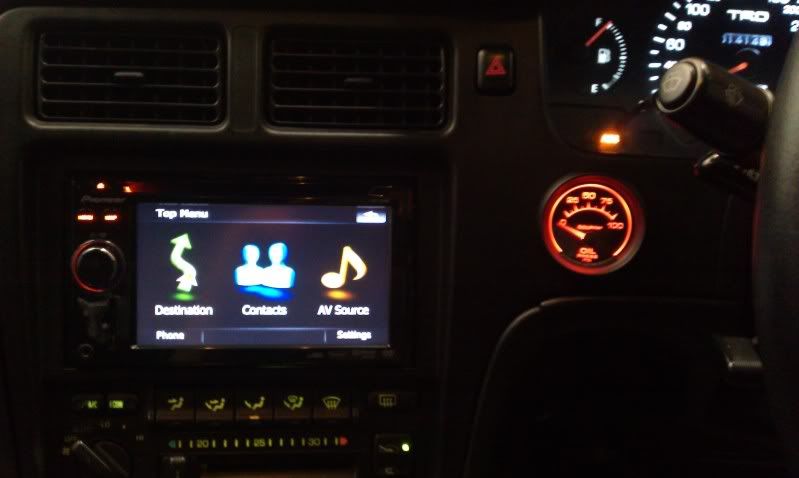 As you can see below, the oil pressure gauge happens to be in my line of sight in the gap between the arms of the steering wheel and the left control stalk: 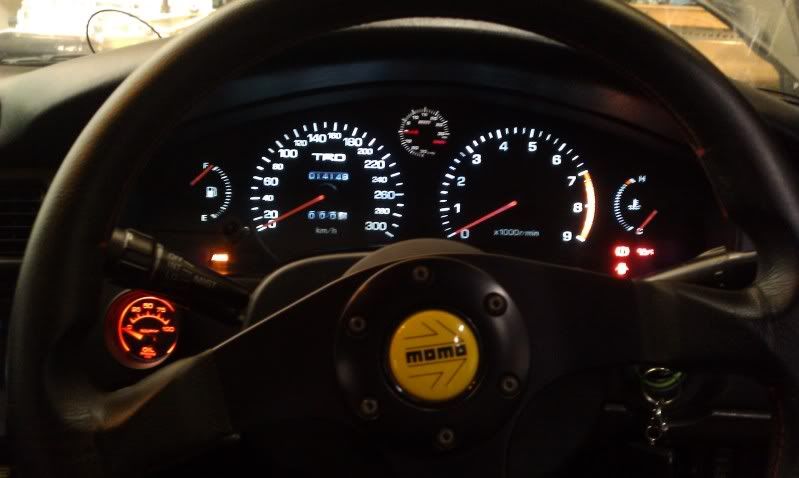 And here are some photos showing the overall completed dash setup:   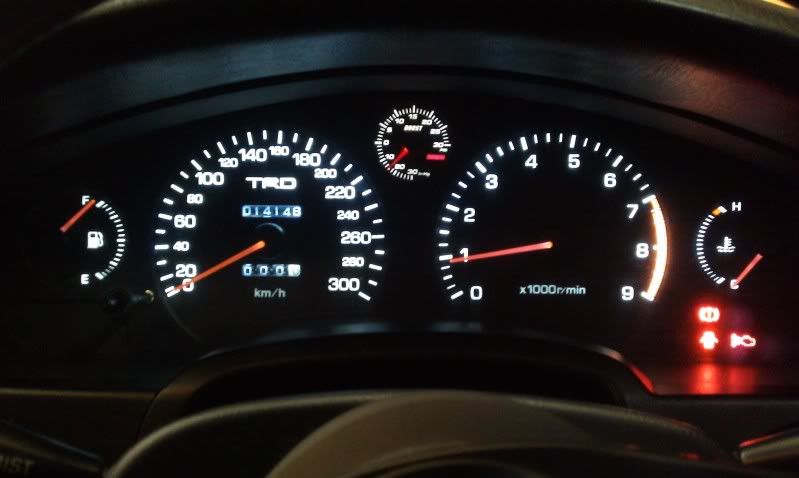 Enjoy!
|
Bionikal
MR2 Scholar

- Total Posts : 1003
- Scores: -171
- Reward points: 2607
- Joined: 2011/04/07 19:51:15
- Status: offline
RE: robk's MR2 Turbo
2011/01/07 19:50:17
(permalink)
not to be racist. But how good is white!
|
Joel
MR2 Enthusiast
- Total Posts : 203
- Scores: 5
- Reward points: 3600
- Joined: 2011/04/07 19:51:15
- Location: Kempsey NSW Australia
- Status: offline
RE: robk's MR2 Turbo
2011/01/07 20:23:27
(permalink)
Very nice mate, interior and whole car is done very nice and tastefully. I want white back lights now.
|
robk
MR2 Deity
- Total Posts : 2172
- Scores: 314
- Reward points: 5229
- Joined: 2011/04/07 19:51:15
- Location: Sydney / Central Coast, NSW Australia
- Status: offline
RE: robk's MR2 Turbo
2011/01/07 23:51:20
(permalink)
quote:
Originally posted by Bionikal
not to be racist. But how good is white!
I know hey I'm so happy with it! quote:
Originally posted by Joel
Very nice mate, interior and whole car is done very nice and tastefully. I want white back lights now.
Cheers Joel!
|