2011/08/21 23:30:29
Shamanova
Hi guys some of you may remember me and my old Mr2 :


She proved to be pretty reliable, a whole lot of fun, and a bit of a money pit. I learned a lot about SW20's from her. It was just a mildly modded Gen2 with all the normal bolt ons (Ct20B, boost controller, dump, cat, ebay intercooler and Legalis R exhaust which I quite liked). I ran a blow off valve for a short while but it was just a little bit too outrageous (bright orange and a big PppppChhhhhh was too much). I got an awesome set of TE37's from a group buy too which I loved.
 
The problem with it was that I felt iffy working on it myself as it was worth a bit of money and was my daily. So I decided to sell it off and picked up a old members car as a project; enters stage left: 

 
There were a plethora of problems with this little car but you couldn't go wrong with the price. The car had been sitting for ages after an incomplete Turbo conversion. The bloke needed it out of his driveway so me and a mate towed her back to my house:

 
After several months I got it running and starting hoarding stuff for it:
 
I got a cheap set of wheels and tyres off the forum - Some old Sebrings

 
Some GenIII lights:

 
Boost controller:

 
Picked up a free exhaust off a QLD member as it was 'too loud' (more on this later) - It's Blitz something? what type of exhaust is this guys?

 
Interior bits and pieces like missing dash plastics, carpets, handbrake a gear boots. 

 
Fitted Twosrus short shifter to get rid of the gear linkage issues that others have when they do the swap, fitted bushings. 
 
Fitted new disks and rotors all round to replace warped and cracked existing. Fitted TRD sway bar, and Twosrus Prothane Urethane Bushings all round.
 
 
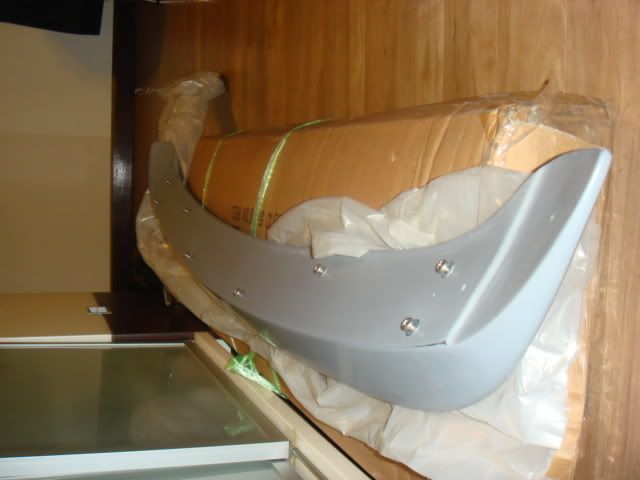
Picked up Aeroware lip and sideskirts from the group buy: (NOT MY CAR - But Black suits these cars so well)

 
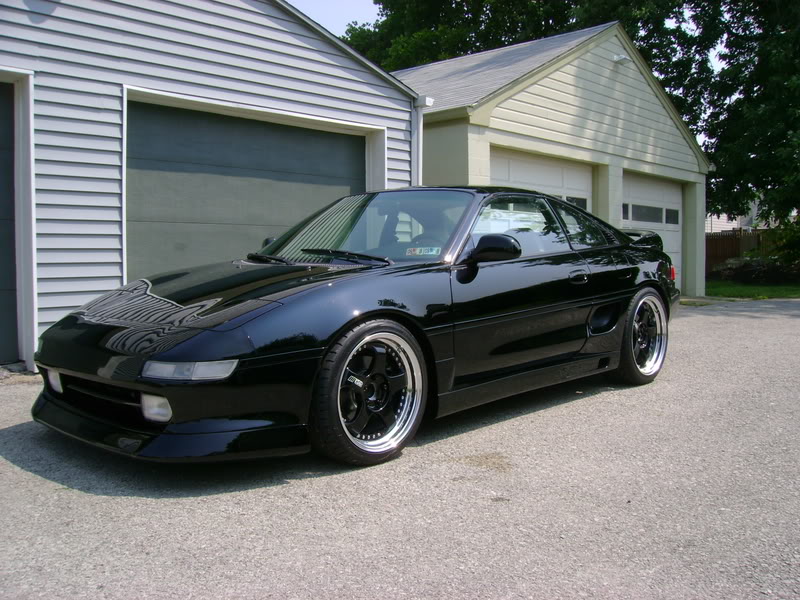
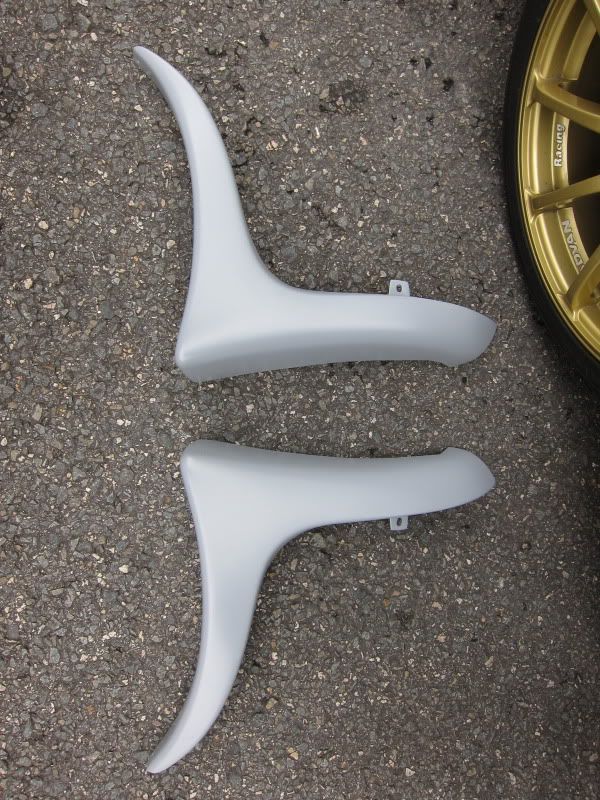
And Picked up Pheonix Power rear pods and Duckbill Spoiler from DB88 


Anyway I had the car painted at Profinish in Morayfield and was very pleased with the results for a budget paintjob. The only problem with it is how low the front lip is. It rubs pretty easily but I am not too worried about it in the grand scheme of things!


More recently the car has had TRD / Apexi Struct & Spring Combo installed with new bump stops and boots, no leaks and got around a 1.5 -2" drop though I was hoping for a bit less. Has minimal Damber adjust on these but appropriate for my use of the car. 
 
Much more recently I took the car down to a local shop to sort out the remaining mech stuff (Aussie Exhaust in Nundah - Used to make the Aussie dumps but the ebay stainless units took away the business)
 
Engine out: timing belt + kit, water pump, and seals, up rated clutch, fly wheel machine.
 
Customised Ebay 3" dump with hi flow cat and flex section to avoid normal cracking, customise the random 3" blitz exhaust with a resonator (any idea what exhaust it is?) with the hopes of easing off the loud drone the bloke warned me about
Fit Blitz SUS Power Filter - fitted this ages ago and it has an awesome induction noise!
Fit Ebay intercooler 
 
And lastly fit Just_Ace's old hi-flowed Ct26 to replace the stock CT26.

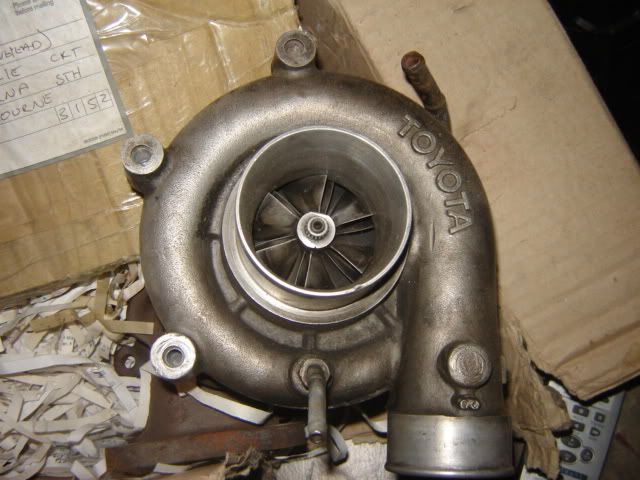
-Hi- flowed ct-26 (twin entry)
T04E 50mm comp wheel
Supra CT26 centre housing
Supra CT26 exhaust wheel so its the steel, thick shaft
Garrett T4 V2 compressor wheel machined into the housing 
 
So after all these mechanical changed still running 12-13psi it definitely feels more powerful. But damn it's laggy compared to the old Ct26. When the boost comes on it comes quite hard and sound pretty awesome too. You can tell that the turbo is wasted at ~13psi so I guess watch this space. But yeah when boost comes on even at 12psi this car has much more get up and go than my old one with normal bolt ons and a Ct20b running 15psi. The previously awesome blitz induction noise is drowned out when the car come on song on boost and it sounds angry!
 
I'll update the thread as I waste more money :) 
 
Todo:
New seats and door cards, fuel pump, rail and injectors and maybe a piggy back ignition solution down the track....
 
2011/08/22 00:20:44
just_ace
never really got to wind that sucker up. had the odd spike to 15, but with stock ecu, biggest thing i found was when i put some NA cams in, allowed it to rev out more cleanly.
2011/08/22 08:44:16
purple5ive
nice work man cars looking great
and yeah i agree the hiflowed CT26 should be run at above 15psi for oomph factor, i have a similar 50mm trim with ct20b exhaust wheel spec and its a bit laggier than stock but once on boost sounds and feels great.
 
just_ace - can you explain a bit more on the N/A cams.
PM me if you dont want to de-tour this thread
2011/09/06 21:24:05
Shamanova
Can't afford new wheels so decided to freshen up mine:
 
2 piece jap rims. Take out all but two of the bolts which hold the centre piece in place, this will let you polish the lip. In an ideal world I would have the tyres removed so I could get a better finish by taking the centre piece out completely (the air valve is in the way). If you were to take the tyres off you'll get an amazing result but you have to pay (will end up ~$200).


In this case my aim was to simply polish the lips - I had a go at kerb rash but I'm not too concerned about it as the rims are old and cheap :). Begin with 320 grit wet and dry (use water for all sanding as otherwise the wet and dry will clog). I went 
320 - 600 - 1200 - 2000. You'll get a reasonable result here but if you have an electric drill with polisher the result will blow you away. 


Next rough up the paint on the wheels themselves. I actually bought paint stripper and etch primer to do it from bare metal but there is a whole lot of work in that so I went with just creating a really nice smooth prime surface.


Prime the sucker up (don't use heavy coats here) 3 coats should be enough. You'll need to give this a rub back with 600 grit (softly) and get it nice and smooth all other!


Now Paint the sucker up. I had the local paint shop mix up a colour for me. It's like halfway between black and gun metal. It's metallic with flakes in it. I found Super Cheap Auto etc only had black and silver wheel paint. One can was enough for 2 rims. Remember start with lightish coats here and never put it on toooo thick. I went for probably 4 coats. (the more coats the darker result you get). Leave it to dry a few minutes between coats (refer type of paint or just read can). The first rim I took really slow and got a superb result. The second I had to rush a bit. On the second rim I sanded it back with 1200 and then put on another coat - remember to use a tack cloth. 


Then clear coat the puppy - I went gangbusters with clear as I bought too much of it AND it's alright on black. You don't want too much on a lighter colour though as It might take on a faint yellow tinge. I used 3-4 coats of clear; I had to rub the second rim back a bit and put on another coat to get a good finish. You can polish the end result but I opted not to as I was quite happy with the unpolished result.


I'll do the front too rims soon.
 
Coming soon - Carbon fibre targa tops and new interior :).
 
2011/09/06 22:09:51
artymr2
Nice work, did you polish the lips with some autosol?  should come up like chrome, even by hand.  Cant tell from the pics if you polished it.
 
Is the rim one piece (the bit the tyre fits on)?  If its split, make sure you deflate the tyres before unbolting.
 
Cheers
2011/09/06 22:21:07
Shamanova
Yeah the part the tyre is on is a solid piece :) - could have got interesting otherwise hey :P. They only have like 1" of dish.
 
I'll have to pick some up from the shop. I was actually dissapointed with the finish of the 2000 grit (10,000 better than how they were but not awesome). So I'll have a look for some at the shop.
2011/09/06 22:28:04
artymr2
I got some 3 piece rims years ago from the wreckers.  the aluminium lips were weathered quite badly (not pitted though) and basically a flat finish.  using purely autosol and a rag, they came up like chrome in no time.  With your prep upto 2000 grit, 10 mins per wheel and they will look like chrome, you will be amazed.
 
when i got the rims i was so excited (and young and stupid), i wanted to clean them up and undid the bolts prior to deflating, before i realised "oh crap!".  luckily, these rims looked like they bonded together somehow, and disaster was averted.  could have been serious!!
 
cheers
 
2011/09/07 14:38:21
purple5ive

Customised Ebay 3" dump with hi flow cat and flex section to avoid normal cracking

 
got any pics of what was done im interested to see how you got a cat on the ebay dump pipe
2011/09/26 18:42:39
Shamanova
Hey Purple - that was a lie actually; ended up not putting it in the dump due to space issues - Was just a bit late when I wrote that and a bit forgetfull :P
 
Forgot to post this but wheels have been on for three weeks now and are going well :).


Cheers
2011/09/26 22:52:31
Senor_2
Just had a read of this thread for the first time, nice work the car is looking great!
12.. >> - Powered by APG vNext Trial
© 2025 APG vNext Trial Version 5.5

Use My Existing Forum Account

Use My Social Media Account